BOSS-LINUX, Backup Script-III

In the previous part we created our backup script. To run this script we need to go the the folder containing the script. We plug the USB to the computer and then double click on the script file to run it. The script will compress our working folder and take the backup for us.

The last part explains how to creates desktop short cut for your script and assign an icon for it. From any text editor, create a file and add content as follows.

[Desktop Entry]
Type=Application
Terminal=true
Name=copy
Exec=/home/milind/Important/45-MyScripts/copy.sh

You may copy the above content and do little modifications. Put your script path in place of mine.

Save the file with an appropriate name and with .desktop extension. For example  test.desktop. Plug the USB and double click on this shortcut. It should run the script properly, compressing your folder to a file and copying the compressed file to your usb.

Now we need to assign an icon to this shortcut. There are many public domain icons available on internet. Download one of them. Keep it to your script folder. Open the desktop shortcut and add the icon path. Finally move this shortcut to the desktop folder. Thus your backup system is ready.

[Desktop Entry]
Type=Application
Terminal=true
Name=copy
Exec=/home/milind/Important/45-MyScripts/copy.sh
Icon=/usr/share/icons/copy.png

Notes :

  1. An easy way to create desktop shortcut is to right click on your script file and choose create link. Later edit this link add icon path and move to desktop folder.
  2. If you prefer to put your icon in the system folder then to move or copy icon in that folder you need to open Nautilus as administrator. That is open the terminal and do  $sudo nautilus, put your password. This opens the file manager in admin mode. You can copy and move the icon to the system folder /user/share/icons.

This completes the Three Part Tutorial. Hope you find it useful.

Author’s Email : oak444(at)gmail(dot)com


BOSS-LINUX, Backup Script-II

In the first part we tested all commands one by one to compress the working folder and copy the compressed tar file to USB disk. Now its time to put these commands in a file so as to run them in order.

Open gedit and type the basic script for test. We first ensure that scripts are running properly in your BOSS-LINUX installation. Your first script should look as follows…

#!/bin/bash
# My Backup script

echo "My Backup Script"
echo "Press Enter To Exit"
read

The first line of the script is important. This is a special clue given to the shell indicating what program is used to interpret the script. In this case, it is /bin/bash. Other scripting languages such as perl, awk, tcl, Tk, and python can also use this mechanism. Next is the comment which is a kind of remark. Comments will be ignored by the shell.

After that we use echo to display some messages. Using these messages you can inform the user about your script and what the script does. You may also echo step by step report of the commands which are being run by shell.

The last command read suspends the script unless the user hits enter. This is a simple way to  give time for the user to read the earlier messages given by echo. Without read the script would run very fast and exit the terminal in a fraction of a second. So it would be practically impossible to go through various echo messages.

Save this file as backup.sh If you now double click on this file from nautilus, the script won’t run but opens for editing. To make this file runnable, right click the file from Nautilus and then open the “properties” dialog. Tick execute as program.

Now try to run the script by double clicking on it.

Once we run the test script, the content can be replaced by our ready commands. Thus we have the final script which looks like the following.

#!/bin/bash
# My Backup script
set -x #echo on
echo "Copy 44-HTML"
tar -czf htmlcode.tar.gz /home/milind/Important/44-HTML
cp htmlcode.tar.gz /media/Milind
echo "Press Enter To Exit"
read

The set -x switches the echo mode on. This will show each command on the terminal as it is executed by the shell. This script should do your backup work as expected.

In the next part BOSS-LINUX, Backup Script-III we will create a shortcut to our script as assign an icon to it. Then we will put this shortcut on desktop. This has the added benefit of running your script without opening shell. You can just double click the icon on desktop and take your backup.

Author’s Email : oak444(at)gmail(dot)com


BOSS-LINUX, Backup Script-I

Those who love to automate small tasks for ease and efficiency will find this article interesting and useful. I have written this article for BOSS users but should work for most of the other Linux Distributions.

Your data is precious. It is often necessary to save sessions of your work in order to preserve your data.

On one fine morning your hard disk crashes. Sometimes you may accidentally delete a folder which contains your years of work.If you have no backup of your work then you are left with nothing. Even if you are ready to work again it may not be practically possible.If you have decided to keep backup of your work on periodic basis or if you are already doing so then this article is for you.

bs01

Taking backup of your folder takes time, especially when it has large number of files. To copy the folder quickly, it is a good idea to compress the folder and then copy the compressed file to pen drive. Also in every backup session, you may want to give different name to the compressed file.

In the first part, we learn how to do this using linux shell (Terminal). Then in the second part we will learn how to put these commands in a script file and run the script file. In the final part, we will create a link (shortcut), assign an icon to this link and put this link on desktop. Ultimately you can take  your backup by just putting your USB in the socket and double clicking this icon.

The file manager in BOSS is called as Nautilus. Clicking home icon you can start nautilus
Another way of starting Nautilus is Applications->Accessories->Files.

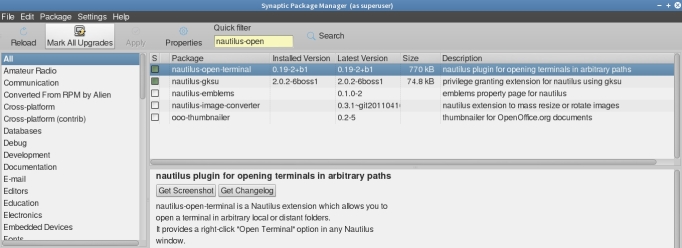
Before we start our tutorial, I would like you to install nautilus-open-terminal plugin. This plugin allows us to open the terminal at the folder opened by Nautilus. Please install nautilus-open-terminal plugin from Synaptic Package Manager.

nautilus-plugin

Now we to start our automation. First we need the absolute path of the working folder. Using Nautilus, go to working folder and open terminal there by File->Open in terminal.

To compress the whole folder, we need absolute path of this folder so give command $readlink -f .    (readlink with options dash f and dot)
This gives me the absolute path of my current folder as /home/Important/44-HTML Your path will be different. Select this path by mouse, right click and copy to clipboard.

Now close the terminal and reopen it. This ensures that default terminal folder is opened. Now test the compress command tar on the terminal. You may use right click and paste path at proper place.
$tar -czf test.tar/gz  /home/Important/44-HTML
Ignore the warning…  tar: Removing leading `/’ from member names

List the current directory by $ls You will find the compressed file test.tar.gz created in the current folder. Now plug the USB and open the terminal on USB, using Nautilus. Note the path by $readlink -f . My path is /media/Milind  Milind is the USB label. This is the target path. Go to terminal default directory where your test.tar.gz lies. Then try the copy command …

$cp test.tar.gz. /media/Milind

The file should be copied to usb drive. In short we have done the following .

  1. Get source path using readlink.
  2. Get target (USB) path using readlink.
  3. compress source path by tar command.
  4. copy tar file to target (USB) path.

This completes the manual test part. We are  now ready to automate the whole task by giving all these commands through a script file in the next part BOSS-LINUX, Backup Script-II

Author’s Email : oak444(at)gmail(dot)com